Sunday, March 28, 2010

What do you get with Metal and Alcohol?..inks that is


The day started out rainy, but now it's beautiful!!!!!! Blue skies and sunshine.

I had painted this small magnetic closure box from Bare Elements-Chris with Twinkling H2o's- Sunflower and Burnt Umber. I let it sit, and could not decide what to do with it.

Yesterday I got out the Ten Seconds Studio molds..Big Daddy 5 and 8. LOVE these. The Bingo numbers on the sides are so fun!


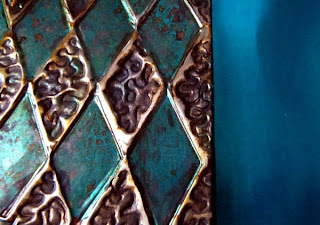
The Slate metal is cool when you want something vintage Tin-Type looking. I was going for Old and Worn here. It's really a blue-grey color. It seems to change with the angle of the light. Closeup shot shows more light when viewed from the top.

I embossed, then sanded and Alcohol inked like crazy to get the really worn look. Used Rust and Sandal with a pinch of Raisin and Lettuce.


The inks really make this color of metal stand out. Then I used the Melody line of papers from Creative Imaginations on the inside, and added little round wooden feet to the bottom.


I met Deb on her way to work and gave her this little token for her birthday!!!!

Happy Birthday Deb....April 3rd is the day.


And guess what she brought me for my birthday....ta da! This fabulous acrylic paint caddy!!!!!!!!!!! Is it cool or what? It came in a million little pieces and her wonderful husband, Gary, put it together for me!!! THANK YOU GARY.....


Bill would have done it, but he thanks you, too!!! REALLY.

So, moving day is Wednesday. Hoping for good weather and no whammies!

Enjoy the day!

Thursday, March 25, 2010

Potion Bottle and Tim's New Dies!!!


Got a big box from Ranger yesterday!!!!! YEA!!!!!!!!!!!!!

Full of Charms and Buttons and Dies, Oh MY!

I had to try the dies on the Grungepaper and it cuts like BUTTAH!


I cut out the Styled Lable, Distress Inked, misted with Ink and Perfect Pearls, and Stamped. (It says Potion, but it's hard to see. And the Perfect Pearls are sooooo hard to get to shine in a photo!)


Then I used the Dimensional Pearls to add some dots. I had to have some bling, so 2 Rhinestones were added.


The lower piece was cut using the Ornate Border cut twice, once for the top and once on the bottom edge. Turned out kinda cool!


I used one of Tim's GORGEOUS buttons tied to the neck of the bottle. And a Color Me Crazy flowers are painted with Luminarte for the accents.


Fun, Fun, Fun!!! Worked with the Birdcage die for a collage, coming up next!


CREATE ART!

Saturday, March 20, 2010

Piling It On with Idea-ology


Look what you can do with the new Charms and Timepieces from Tim's fabulous Idea-ology pieces!!!! SEVEN pieces of metal used here.


Is this fun, or what?


The Grungeboard background is embossed, heavily inked, sprayed, stamped, and sewn on the sewing machine. I used Tim's new Urban Chic stamps...VERY COOL!!!


It's hard to see, but there is a Snap that is layered under the Spinner that has had a hole punched in it. Several holes were strategically punched to get this thing to fit together.


Engineer a project and have fun!!!!


Cold and ugly here today....reading an unbelievable book today by Michael Lewis. It's called The Big Short- Inside the Doomsday Machine, and is about the causes of our recent financial crisis. Everyone should read this book. Truly an education. Jaw dropping!


Off my soapbox now............go play in your stash of stuff and Create ART!

Hoping for Spring to return in a couple of days!

L

Thursday, March 18, 2010

In the Garden


Spring, hopefully, is around the corner. Today was a beautiful day!!!! Sunshine, blue skies, and the birds were everywhere. Had coffee with my friend Deb, and tomorrow, shopping and probably lunch with Susan. Life is good.

My early tulips are at least 5 inches tall already. And if the rabbits don't get them, they should bloom in a couple of weeks.


Having said that, I took some pictures from last years flowers and put them in a layout for Creative Imaginations with Christine Adolph's Mon Ami papers. Used Distress Inks Broken China and Dusty Concord to brighten things up a bit. The flower is a bunch of Color me Crazy from Petaloo.


I have tons of pictures stashed in a book of flowers, but this gave me the incentive to put them together with a bit more flare.


Enjoy the day....and tomorrow is supposed to be even better!


Linda

Sunday, March 14, 2010

Class Pictures


Here's Jean's project, her Tool caddy, from the front.


This is the back...she added a metal heart...very cool! See Tim's new Urban Chic stamps!!!


Took my camera.....forgot to take pictures. But they were all VERY different, but extremely GREAT!!!!


BUT, Jean from the class, sent me pics of her project!!! Yea!


She took hers home and added micro-beads....since she's a beader...it figures. She did a FANTASTIC job. We Distress Inked, Stamped with some of Tim's new Urban Chic, Embossed some Metal with Ten Seconds Studios new molds.

Take a look and enjoy. BYW....they used the same wooden box at Ranger U this week...I'm just sayin'. Ha...who knew????? It wasn't Ranger U, but you did get to work with the same box! Check out Suze's blog.


Have a good one!


Linda


Friday, March 12, 2010

Collage with Wax, Metal, and Wood


I have kept this little beeswax canvas knowing I would find a place for it some day. It was one of the practice pieces I did before attempting the Ranger Designer Challenge collage.


It's a transparency of my Mom when she was in her early 20s. Beeswax, stamping, rubons, and Perfect Pearls are all a part of this tiny piece.


You know the Peacock metal is the background with Luminarte, Alcohol Inks and pens. (Sorry for the glare at the top....this stuff is hard to photograph!)


Then we have the gold lace and ribbon on top of the thin Cherry Wood from Creative Imaginations,that I cut with Tim's new die from Sizzix. And the Petaloo flowers are the final touch! Aren't they gorgeous??? Mom always loved to plant and arrange flowers, so this had to have flowers on it.


Have a great weekend!

Wednesday, March 10, 2010

BEAUTIFUL Peacock Metal-UPDATE


***UPDATE-One of the comments said this color looked more green than blue. That is a result of the Luminarte misting and the angle of the shot. This shows the finished project on the left and the original metal on the right. The picture of the finished project is taken under an Ott light...not always good....but it's the only way I've found you can show a "metallic" affect that is very hard to photograph. If you look at the metal straight-on...it's more blue, at an angle...it's more green. See the color to the far left turning more green?


But, that having been said....I think the photo of original metal is too blue...it's really more turquoise. *****


This blue is truly GORGEOUS!!!!!!!!!!!!!!! I have got to tell you. It's the Peacock color that Ten Seconds Studio just released.


I used a couple of new molds and the older diamond one here. Also used Lin Brown's fabulous "controlled squish" method to get out of spackling the back.


She is BRILLIANT!


Then I sprayed with some of the new Luminarte sprays(recently bought by Creative Imaginations) and added a bit of Alcohol Inks to the raised areas. Some black acrylic paint was used in some of the recessed areas as well.


TOO MUCH FUN!!!! I put it on a square canvas and will use it for something. But I had to show you how beautiful this new color is with the gold accents.


Go Play and CREATE ART!

Sunday, March 7, 2010

Teresa Collins Shaker Box


I've always been drawn to the combination of Black, Ivory, Red and Brown. So while I was in Scrapbook Friend'z the other day, I saw a bunch of papers by Teresa Collins that caught my attention.

I bought 3 Shaker boxes years ago and have only used one. I decided to drag the middle one down and play around with it.......the sun was shining, the silly Daffodils were coming up (they will be sorry at some point I'm sure), and the birds seemed to have come out of nowhere....finally.

These papers are wonderful, but I wanted to add just a hint of blue to add interest instead of my usual brown. Hence, a bit of turquoise. But it was very white in the light spots, so, I used the Antique Linen Distress Ink to make it fit in better.

You can make almost any paper blend in with the right Distress Ink!!!!! And since I needed more red and black paper, I used the new Barn Door on the black and white paper..........now it's black and RED!!!!! Ta Da!

I cut out the flowers with the Sizzix die and a small punch...added a bit of Distress Ink.... a Teresa Collins stamp to the blue petals....some dots.....and of course a rhinestone in the middle for a bit of bling.

Tie some tulle around the handle and it's ready to sit out for Jerry the Easter Bunny (Emma's Friend) to hide something in.

Have a great week.

Update


I know I showed you this box before, but I got Tim's new Foundations in from Idea-ology and they were screaming to be added to this piece. The box is from Bare Elements and the papers are Creative Imaginations.


Don't cha just LOVE the way they go with the Bookplate???????


Kitting up today, wishing it was yesterday when the sun was shining...today it's nothing but rain....YUCK!


Good day to work in the Studio.


Enjoy the rest of your weekend and Create Something!

Thursday, March 4, 2010

Ten Seconds Studio's New Stuff!!!!


You all know how I LOVE TSS metals and molds. Well, Cheryl sent me the new colors and all the new molds!!!!!!!!!!!!!!!!!!!! YES!!!!!!!!!!!!!!!!!


I LOVE them all!!!!! And I'll bring them to class on the 13th!!!

Here is a 3 drawer box that I covered with the new Bronze Gold and some Barn Red thrown in for color. I also used a technique from the Great and Wonderfully talented Lin Brown of LB Crafts in the UK to add texture paste over the edges of the metal. Then stamp into the texture paste.


You must visit her blog. And if you're lucky enough to be in the UK, her classes are to die for......go look.


Anyway. I used the new Big Daddy molds 07 and 08. Don't you just love the words? And the Kabukas 07 and 10 for the wonderful Timepieces and backgrounds.


I added black acrylic paint and Glimmer Mist to the top for a more aged look.


White Acrylic paint was dabbed onto the texture paste just a bit.


It was fun, had a great time using the new stuff, and hope you get some inspiration from the pictures.


Go Create ART!

Tuesday, March 2, 2010

Melody Book


As some of you know, I've been asked to be on the Creative Imaginations team as well as the Petaloo Design Team. These products work so well together!!!! It's a joy to work with them.

Here is a book by Bare Elements that's cut apart and decorated with the Melody Line of papers and embellishments. Then I punched holes and added a ring with some ribbons.


The cute little sparklie flowers are the Dazzlers from Petaloo. LOVE these colors, and they are all ready to go, glitter AND rhinestones!!! What more could a girl ask for???????


The butterflies and music are so much fun. Our personal lives here are all around music, so this line was a treat for me to work with. Piano keys, notes, treble cleff, base cleff.....just fabulous epoxy stickers.


And of course...........MY KIND OF COLORS!!!!!


I had enough left over to make a CD case for my favs from GLEE!!!!

So take a look, enjoy, get some inspiration possibly....


and CREATE ART!