Wednesday, July 31, 2013

Altered Hand Trinket Shrine Pendant

I am currently possessed by the projects with Hands from Retro Cafe Art.
 
This is the Hand Trinket Shrine made into a Pendant or Necklace.
 
 
I basecoat it with Snowflake Fresco Paint and then add various colors to the edges.
 
The rest is done with Sharpie Permanent Markers....Doodles, and Doodles + Color.
 
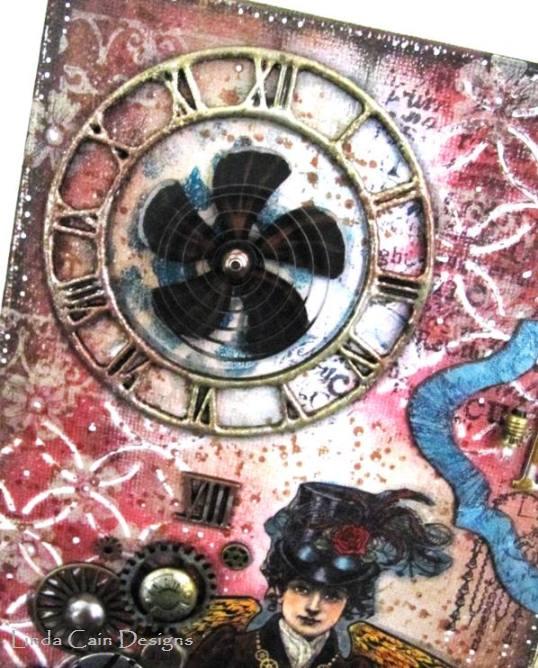
The Steampunk Lady in the background is from a Collage Sheet...Gear Head Steampunk by Debrina Pratt HERE.
 
I absolutely LOVE this sheet!

 
I had a Vintage Ball Chain and a Clock Face that I glued into the center.
 
The Flower on top is a Mini Fairy Bloom I accidentally broke somehow, but it worked great with a Silver Nail Head.
 
 
The Ball Chain fits easily into the channel made from the 3 layers of the hand.
 
Click HERE to see a better picture of how the chain fits through.


This is the Back that's painted with Blood Orange, Lilac, Eggplant, and London Bus Fresco Paints.
 
I stamped the Ink and the Dog Mini 59 from PaperArtsy (Watch Collage) on the back with Jet Black Archival Ink.
 
The Frantic Stamper carries the Fresco Paints and PaperArtsy Stamps now!
 
So check out the links, let me know if you have any comments or questions, and I'll be back hopefully soon with my Steampunk Collage using lots and lots of ephemera!
 
Come on Mailman.....deliver the goods!!!
 
Linda

Monday, July 29, 2013

True North Hand and we have a WINNER!

Well it's Monday and we have a Winner to the Retro Cafe Art Giveaway.
 
Without further ado.....the winner chosen 12:07 AM is.....
 

Enter a lower limit:
Enter an upper limit:
Random Number:


Love those little coil earrings on your DODT Shrine!

Yay! Such a low number, never had that before! Whoo Hoo!
 
And as an added piece of information, I get to be the Guest Designer today on the


Here's the front.....


 ....and here's the back!
 
Want to know how to make this piece???
 
Go check out the PaperArtsy blog and I'll tell you!
 
So, congratulations to the Jennifer, let me know your address and Kristin will get your prize out to you. (Gift certificate or DOTD package?)
 
Linda


Friday, July 26, 2013

Sneak Peek of Collage & Giveaway Reminder

Well it's a rainy Friday here, but tomorrow is gonna be gorgeous!
 
We're going back to Chicago for the Historical Architecture Tour. Should be fun!
 
But I wanted to remind you that you still have time to enter the Retro Cafe Art Giveaway until midnight Sunday....we'll draw at 12:01 AM CST on Monday.
 
YOU MUST LEAVE A COMMENT ON THE PREVIOUS DAY'S POST TO BE IN THE DRAWING!!!


Now here's the Sneak Peek of what I've been working on in the Studio.
 
I am in LOVE with the new Graphic 45 Steampunk Spells Collection. This Lady is just drop-dead GORGEOUS and had to be in a collage.
 
The other elements include Prima Mechanicals from my favorite Finnebair...too wonderful for words, Retro Cafe Art Parts, and Paper Artsy Products...Grunge Paste and Stencils.
 
I'm waiting for the delivery of a few more things....but stop back next week and I'll have it done and posted.


Last weekend we were in the Quad Cities and had dinner with Alex and Michelle at The Iowa Machine Shed when it started to get VERY, VERY, dark out.
 
When we came out it was pouring, but was over in a few minutes.
 
This is the shot of the double rainbow we saw on our way back to the motel. Kinda like the raindrops on the windshield effect!
 
So, all in all.....remember to leave your comment on the previous post to win the Prize Package OR $25 gift certificate....and come back Monday to see who won!!!
 
Linda
Initially I went to upload this at about 4:30....but I made the mistake of calling Verizon Wireless to ask a question about why I couldn't upload pics from my phone now since...January or so.
 
3 1/2 hours and 5 technicians later they finally found someone to UNDO what they'd had me do to upload 4724 pictures to my phone!!!!!
 
Ended up with NO email coming to my phone after I let him go.....I figured that out....but, needless to say, it was not a pleasant evening. GEEZ!!!
 

Monday, July 22, 2013

I've got an idea...Let's have a Giveaway !!!

Well actually, it was Kristin's idea from Retro Cafe Art - owner and designer. What a great one though!
 
Who wants a GIVEAWAY?????
Dumb question, right.... 
 

I was so inspired by Kristin's DOTD Shrine that I had to jump in and make one of my own.

These guys are just way too much fun to ignore!

Thanks to  Sherry Westfall Mathews,  I got out my Dremel and drilled holes for the Gold Wire Earrings I twisted. It drills through that Masonite like it was "butta".

You MUST check out Sherry's works of ART, they are AMAZING!


This is the one Kristin made.....PERFECTION, no?

Love the Black and White detailing.


So I had to make one with her perfect Carved Stone Ivory Skull Bead, Paper Flowers, Doll Arms, Mini Dice for eyes, and a tiny Bottle full of Poison which is  Lettuce Alcohol Ink.

A little bit of Christmas Red Stickles adorns the Crown.

I sprayed the Flowers with  Turquoise  and  Sunflower Sparkle  Perfect Pearls Mists and used 2 stamps from Tim Holtz's  Mini Halloween  set to make the Bottle Label.

This stamp set and PP are still available at Inspiration Emporium!


This is a detail of the Shrine where I used Gold Tinsel and black Tulle to fill in the area.

I added white and silver Rubons and Posca Pen detail around the piece, too.

So here's the deal.....

Leave a COMMENT on this blogpost and the Random Generator will select a winner NEXT MONDAY to receive....
 
NOT ONE, but TWO Inspiration Shrines - Dia De Los Muertos kits  plus several other pieces to embellish them as in charms, roses, beads and such from Retro Cafe Art!
 
OR....you can have a $25 Gift Certificate from Retro Cafe Art...your choice!

Good luck to everybody and don't forget to click on the links here to see the products you can get at Retro Cafe Art!

Linda
Check back on July 29th for the winner!!!


Friday, July 19, 2013

Vintage Lady Collage on Canvas

Sometimes it takes a while to get things finished...or framed.
 
This is one such case.
 
I created the flower elements and the the background a long time ago when I was working on the Cloth Paper Scissors donation piece for Breast Cancer Awareness.
 
But I never got around to framing it and taking some pictures.
 
 
The 8x8 canvas board piece is now in a shadow box frame and needs to be hung on the wall.
 
The Flowers are die cut from Crinoline and sprayed with Dylusions Inks.
 
The Flower centers are from Graphic 45, as well as the Lady in the die cut frames.
 
 
Perfect Pearls and Computer Parts create elements throughout with an Old and New flair.
 
I love her earring. I've also added color to the Lady with Tombow markers.
 

The fern leaves are from Vintaj.......
 
 
....and so is the Butterfly. I painted the Mini Gears with paints and sprays.
 

There is a doily underneath all the Golden Fluid acrylics, and the wings are black German Scrap.
 
I love painting on canvas with the Golden Fluids. The doily really stands out with the darker background painting.
 
I also added a piece of copper wire I coiled up and polished.


A few more gears and some real pearl buttons here and there and she's found a home.
 
I was lucky enough to find an 8x8 shadow box with glass to frame it in.
 
Thanks for stopping by.
 
Linda

Monday, July 15, 2013

A Little Bit of Bewitching and Spooky Fun!

I've been into the Orange and Lime Green Paints lately and of course that usually means it's time to play with Halloween or Witches.
 
This Inspirational Fairy Shrine from Coffee Break Designs/Retro Cafe Art is just the thing to get your creative juices flowing.
 
 
The other RCA pieces used are Garden Insect Cutouts, Wing Cutouts-Large, Glasses and Monocles and the base from the Oval Cameo Frame.
 
The face is from the Fairy Art Doll Cutouts.
 
I also used Graphic 45 papers Steampunk Spells and Happy Haunting Collections for the hat, bats, wings, owls, and the Potions sticker.
 
Glitter Glue, Fresco Paints, Stamps, black and white pens, Ice Stickles, and some Liquid Pearls finish it off.
 
 
Now this is the WEIRD thing that happened!
 
I used Black Diamond Ice Stickles on the glasses. I thought it was dry.....looked dry....so I had glued the head onto the body and added the hat and glasses.
 
My only guess is that there's a little tiny piece of glitter in the frame that might have been reflecting the green...OR the glue wasn't completely dry and the light refracted through it and created the reflection.
 
ONLY a green light under each eye.........really, really weirded me out!!!
 
I'm glad I took a picture that night, because the next day, try as I might, turning it this way and that, I COULD NOT get it to glow again.............do do do do!!! ( Twilight Zone music!!!)
 
You've GOT to click on the picture and enlarge it to appreciate the eeriness.

 
I used Fresco Paints for the Cameo base and stamped with one of my all-time favorite stamps from Tim's - Apothecary Set.
 
I stamped the Spider Web from the same set with Guacamole Fresco Paint on the large wings.
 
 
This is the base with a Potions Sticker and a closeup of the Spiders and Owls.
 
I think the little Owls peeking out are too cute!
 
 
 Anyone who's photographed glitter or mica sprays knows it's a difficult task to show them well.
 
This shot does show you a bit better how gorgeous Black Diamond Stickles really is...it's full of blues, purples, and greens!
 
And did you know, if you touch your Glossy Accents before it's COMPLETELY dry, as on the hat, and leave a finger print, you can take a small detail stamp and stamp into it for some cool texture???
 
I'm just sayin'....it saved my day!
 
So give it a go, and let me know what you think....the links to products are throughout the post. So Check them Out!
 
Linda


Thursday, July 11, 2013

Oddities Charms and Earrings

I was cleaning out my "Studio Stash" and ran across a whole sheet of Shrink Plastic that I'd painted with Gesso a long time ago.
 
BONUS....a project already started! 
 
 
 And this is what I came up with............a bit Odd....yes but fun none the less.
 
You can do this with any stamp, so lets see how this comes together.

 
 Here is the sheet of Shrink Plastic already painted with white gesso and left to dry overnight.
 
I don't know why, but if it has time to cure, in the long run it heats up better.
 
So take your stamp and stamp onto the painted side with Black Archival Ink. I use a foam pad underneath and get a crisper image.
 
NOW....if it's a dry climate, it should dry by itself. I have in the past, had to LIGHTLY, VERY LIGHTLY dry with the Heat it tool.  But not very much as it will start to melt the plastic.

 
 You can either put drops of Dylusions Spray Inks on your craft sheet or dip your brush directly into the open bottle.
 
Paint as you like realizing that when shrunk it will become darker and more vibrant. Two coats sometimes works best.

 
 Here is the hand with a large hole punched in it, sitting next to the Heat it Tool.
 
 
 And now it's been shrunk and flattened when it's still hot, with a piece of plastic or a large Fragment, seen here.
 
See the difference in color intensity and the size of the Charm!!!!
 
Cool, eh!

 
 Side-by-side comparison.
 
  
These Eyes are from the same stamp set using 2 different colors for the eye shadowing.


I added the Charms to earwires and used a Pewter bead charm to add some interest.
 
I think I know someone who will want these to wear just for fun.........and it's probably not my Mother or my Grandmother....(inside joke here!)
 
So give it a whirl and let me know what you come up with!
 
Linda
Products Used:
Tim Holtz-Stamper's Anonymous - Oddities Set
Claudine Hellmuth - White Gesso
Ranger - Heat-it Tool
Ranger - Non-Stick Craft Sheet
Stamp block or Large Fragment
Crop-a-dile
Jewelry Pliers
Silver Ear Wires
Pewter Charms
Small Paint Brush

Friday, July 5, 2013

Fairy Shrines - A New Addiction

I've had a few moments of clarity lately...and they involved Retro Cafe Art Fairy Shrines.
 
I have found they match up really well with Fresco Paints and PaperArtsy Stamps.
 
(Links for stores that carry PA are on my side-bar on the right.)
  

These are the 6 Shrines I was able to create. 2 are duplicates for the Swap.
 
You can find the info here on that fun project going on at RAC using these 3 Shrines 1, 2, and 3.

 
The Shrines come packaged flat, cut from Masonite, and they pop out perfectly!
 
 They end up being about 4 1/4 inches tall.
 
I used the rectangular piece that comes out, shown here, to add my signature and create a little bit more of a stand when glued to the lower back of the shrine.
 
 
Here you can see the assemblage before I add the back.
 
The base coat on most pieces is several colors of Fresco Paints that I add with Cut-n-Dry Foam squares. Then I stamp with Archival Inks.
 
The inside of each of the shrines has embossed metal foil tape. Some have also been tooled with a detail roller as well.
 
This is the one I designed first. HOWEVER, do NOT add black permanent marker to the back of the Doll Head faces!!!
 
In some areas it will seep through, and create a badly bruised look around the lighter portions...like black eyes or a nose...Live and Learn.
 
Use a water-based marker to color on the back if you don't want to see white paper from behind,
 
Kristin had to send me more faces to finally get Joan of Arc back up and running here! Thank you Kris!

 
I love how the Blood Orange and Haystack combined here with Smoked Paprika create the body. And the Guacamole, Bora Bora and Inky Pool dress up the Dragonflies to go with the Turquoise glittered wings.
 
Martha Stewart Glitter Glue that I've had for ages just came in the perfect colors!
 
 
Here is the Queen....her background in the shrine is one I rolled down completely with a fine detail tool after embossing. Just a little different look.
 
The really COOL thing about the Doll Heads is that they're all cut out for you, and they are a perfect fit on the Shrines! Great Thinking, Kris.


And this little lady has the face I used after I ruined poor Joan of Arc, but I love how her coloring was perfect for the of the rest of the shrine.
 
Each Shrine comes with a Crown, but I used a Sunburst here instead.
 
I added the Large Arrow charm to the Moth.
 
So check out the links below, email me any questions you have, and get your little Fairy Shrines to join the Swap!
 
They're on SALE people!!!
 
Linda
 
 
Products Used from Retro Cafe Art:
Products Used from PaperArtsy:
 Other Products:
  • Martha Stewart Glitter Glue - Turquoise, Fire Opal, Florentine Gold and Tourmaline
  • Black Archival Ink
  • Metal Foil Tape
  • Embossing Folder
  • Metal Detail Roller
  • Cut-n-Dry Foam
  • Pearls
  • Crafter's Pick-The Ultimate White Glue
 

Thursday, July 4, 2013

Happy 4th of July USA

I've made more 4th of July projects this year than ever.
 
But this one from last year is my favorite.
 
So today I'll just share an Oldie with you and say I hope everyone, everywhere, has a safe and happy holiday.
 
 
Linda

Monday, July 1, 2013

Stars and Stripes - A 4th of July Tag

It's July already....and here in the States that means the 4th is very close.
 
This is a tag I made to celebrate and honor our heritage.
 
I'm so happy to share the tutorial for this tag over on the Ranger blog today.  
 
 Happy Canada Day to all my friends up North...you know who you are!
 
And one more thing...Shelly Hickox aka the Stamptramp had a great tip today, Bloglovin should help relieve the pain of following your favorite blogs, since the Blog Reader is gone.
 
 
I also thought I'd pay tribute to my personal hero, my husband Bill, or William Frank as he's called around here. 

 
This is his Navy picture from many years ago.
 
We recently took a terrific trip with friends to Chicago. Once there we boarded an Architectural River Cruise along the Chicago River.
 
If you have the chance, do no miss this. The Narrator, a volunteer, never stopped with the information on the 90 minute cruise. HE WAS AMAZING! The facts and the history he shared with us was above and beyond belief!
 
 
These are just a couple of pictures I took on the cruise. The old.....

 
....and the new. Mr. Trump's building.

 
All the bridges have different styled towers. I found them as interesting as the buildings.
 
 
It was overcast all day. But this shot of the skyline was quite striking with the colors.

 
This was my favorite shot of the day. As you round the curve in the River, you see the reflections of the buildings in the windows of the curved building across the way. Click and enlarge it to see the magic!
 
It's even more impressive in person.
 
 
Then the Sailor and I went out to Navy Pier for a wonderful dinner. He was stationed up at Great Lakes Naval Base for basic training.
 
So, that's it for today.
 
Take a jump over to the Ranger Blog for my tutorial and have a safe and happy 4th of July.
 
Bill and Linda