Friday, June 29, 2012

Guest Designer Project with Ryn's Stamps


My new Friend in ART is Ryn Tanaka from London, Ontario.

I think what she's written about herself on her site says it best.


"Although Designs by Ryn currently focuses on Rubber Art Stamps, I dabble in many different art forms. Keeps things fresh and my mind inventive! I find that one passion crosses over to the next adding a different spin to it.

For example, through experiencing various dance forms I discovered how the body bends and applied movement to my visual art. In 2004, I was lucky enough to apprentice with a silversmith in Cuenca, Ecuador. There I discovered that jewellery is simply miniature sculpture - I also developed an insatiable thirst for exploring more of the world. My latest interest in designing Rubber Art Stamps has shown me that they are not all that different from Printmaking."

I, too am a dabbler, and can appreciate this in others.

So I agreed to pick a couple of stamps from her collection and make a piece.


These water droplets blew me away!!!!!


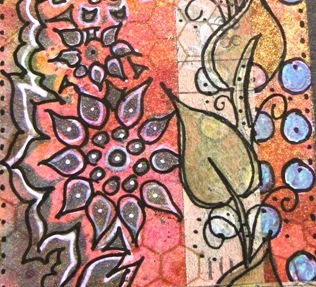
Now, I don't know why I picked the moths to go with water droplets, but I did.

First I stamped the moth 2 times and embossed with white embossing powder.

Then I used Distress Inks to add base colors....purples and oranges. They combine to make a green color in the middle.


I made 3 tags...and stamped things just slightly different on them.

Here you see the drops straight up and down.

I liked the ones going sideways the best.

And some background drops are stamped with Venetian Orange Archival ink as well as the Jet Black.

The white pen makes the drops stand out when used on the black drops.

One tag I used a very small tipped black pen, and the other a slightly larger one.

Extra black pen around some drops just didn't work for me....IJS.


I really liked how the happy accident with the white embossing powder highlighted the top moth on this tag. Almost like a ghost image.


I outlined the moths in black pen and added dots to one tag.

I used black Glaze Pen on the other tag with stitching marks.


Then I glued it to a piece of black chipboard....and.added more strands of white pen.

If there's one thing I've learned, is not everyone likes the same thing...so I put up both tags for you look at.

Also, everyone has an opinion...which is a good thing. That's how we learn...truly!

I was going to add a ribbon, but I found I just loved the way they looked without one.

I just couldn't bear to cover up any part of the tag.....


This stamped image was colored with Distress Markers and topped with Glossy Accents.

Just another way to use the Moth Stamp.


So check out Ryn's lovely stamps...and let me know which tag you like.

Your Friend in ART,

Linda

Monday, June 25, 2012

Standing Curio Class at Prairie Art Stamps

We made beautiful music Saturday in class at Prairie Art Stamps!

Oh, yes we did!  Donna and Tina created some while drying the Alcohol Ink in their little bottles by blowing into them....which did make a familiar sound from childhood....pop bottles, remember them???


Tina was a first-time student and the smile on her face when she left is what makes teaching all worthwhile.

I am sorry that I didn't get pictures of everyone's faces...those with their backs to me...I am sorry.


Supplies are all over...the students were hard at work. But sometimes they were concentrating so hard, you could've heard a pin drop!


But most of the time, chattering and laughter is what we're all about.

Here MaryLynn and Pam share a moment.

Pam's beautiful daughter Penny blessed us again with 2 fabulous bakery treats.

Penny is an amazing baker. Generous to a tee, and the goodies were definitely from heaven.

She was the hit of the day!!!! Thank you Penny for your wonderful generosity and talent.


Deb, the uber talented, came up with some really fabulous ideas along the way...


And MaryLynn was right there to add some fun throughout the day.


Sweet Sue used her leftover metal to add to her project. IT WAS AMAZING!!! Loved her idea....wish I'd gotten a picture of it, but I wasn't thinking.....or maybe I was thinking about the other half of my Penny Perfect Treat calling my name....????


I try hard to make my classes "laid-back and fun."  No pressure, just creative exploration.

Here Judy, who I am blessed to call my friend and cohort, shows the laid-back, relaxing atmosphere we endeavor to make in class.


So poking playful fun here at Rhonda.....trying to make her paint dry just a little bit faster by blowing on it.

Hey, whatever works!

And Dear Linda B...love her to pieces....if you have the chance to take her Memory Box Classes...don't hesitate. She is brilliant!!!!


So, all in all, a great day. And many, many thanks to Terri and the staff...Annette and the 2 Judys.

They make it like Disney to come there....you know..."the Happiest Place on Earth"....at least for all of us Dabbling Artists!

Next stop......The Scrapbooking Studio in Bloomington!

Linda

Friday, June 22, 2012

Journaling Tag Exchange


There are a group of friends I have that love ART.

We recently decided to have a Journaling Tag Exchange for fun. Just to get out of our comfort zone and spread the  Joy of Art.

This is the tag I sent to my friend  Nancy Crissinger.

Mainly it's Dylusions Sprays, Stencils and Stamps...plus some Perfect Pearls Mists.


But this is how it started out. It's just the left-overs from my Little Sunshine piece after I sprayed the daylights out of my flowers. (See previous post for colors and sprays)


All this wonderful spray was half dried and some still wet on my craft sheet.

So I misted water on all of it and dragged 3 tags through it.

I was amazed at the amount of color I got from the left-overs!

The Perfect Pearls REALLY added some wonderful color. This is a night shot since it's very hard to show metallic colors in daylight.


Anyway, the next thing is to add some Tissue Tape and Stamps and ....on and on with pens and more ink!


Every time you tip the tag a different direction, you get a different metallic shimmer taking over the background.

That's what the Perfect Pearls do to the tag.

AMAZING!


This is the Fantastic tag I got from Susan Kesselman!

I LOVE it. So many layers of colors and stamps!

Out of the box and into the fun arena of Tag Journaling!


Be Well and have a great day!

I'm off to Prairie Art Stamps tomorrow for a class. Only 2 seats left if you want to come and play!

Linda

Saturday, June 16, 2012

-----------Create a Little Sunshine Challenge-----------


The Inspiration Emporium Design Team has a Sunshine Challenge going on.

"This month we are challenging you to Create a Little Sunshine…whether you want to make it sunny & bright or calm & beachy, it’s your choice. We love to see how everyone interprets each challenge and makes it their own…"


This is way out of my comfort zone!

I am not a Scrapbooker....I admire those who do the work, but I am not good at it.

Having said that, I didn't have any real "sunshine or beach" stamps, so I went digging for photos.

This is a granddaughter who is now old enough to want to remain "unnamed" in old pictures.

 This is the 1st pool this little one had in the back yard at our house. We think Uncle Carlo was blowing bubbles in the water to make her laugh....which was enough to make us laugh till the tears rolled down our faces!

So, let's begin!!!


This is nothing more than a cheap Michael's wooden frame.

I used Distress Stains Faded Jeans, Mustard Seed and Spiced Marmalade on it in spotty areas as you can see. I should be BRIGHT!

This is the back, but it shows the steps well.

After it's dry, add torn pieces of Composer Tissue Wrap with Multi Medium-Matte until it's covered.


When it's dry, add Picket Fence Distress Stain to the whole piece to tone it down.

The colors change dramatically when you do this.

I added some Vintage Photo Distress Ink direct to paper and blended it in spots.

Then the Aqua and Snow Cap Acrylic Paint Dabbers were used to "dab" blobs of paint here and there.

When it's completely dry....add a touch of Gold Paint Dabber to the edges.

This ends up looking like LINEN...I don't know why....but it does!


Then I cut flowers with the Mini Tattered Florals die and Crinoline. I made a LOT!

I sprayed them with Dylan's Bubblegum Pink, Vibrant Turquoise, and Lemon Zest.

I dried them and added Perfect Pearls Mists Sunflower Sparkle and Perfect Pearl.

These ended up darker than I'd expected.

So later I made more with less spray and more muted colors.

That's what I ended up using.


BUT, didn't these turn out soooooooo stinkin' CUTE???

I loved them!
Then I cut several of the Mini Butterflies out of packaging plastic.


There is a tutorial on this in an earlier post, but you basically add 3 colors of Alcohol Inks to the Applicator Felt. Don't let them touch.

Here I used Stream, Wild Plum and Watermelon.

It's turns out different every time...just dab the inks on the back.

Wait a few seconds till it's dry, and add another layer that creates backwashes and pools.

Practice on a scrap until you see how they work.

These turned out beautiful. The colors are gorgeous!

Heat with the Heat-It Tool slightly, and shape into a butterfly in flight.

Simple as THAT!


I used the Word Band and some Aqua Paint to cover the words.

Let it dry for a minute, and wipe off gently. Buff to remove the excess paint.

I added a couple of pieces of twisted gold wire and mounted on a scrap of cardstock.


I had a bag of Turquoise and Gold mini beads to put in the Corked Vial, and added some Bakers Twine in a bow.

See the difference in the lighter 2nd generation of flowers?

I threaded metallic gold thread in a needle and sewed the Prima Wood Buttons-Songbird pieces to the flower centers.


This closeup shows the gorgeous colors of the butterflies.

The Aqua Rhinestones matched perfectly on the body.

See how the wood somehow looks like Linen here?  I really like the way this turned out, and I have no idea why it did this.


Side Bar..... these are the backgrounds I made with the left over inks from the flowers.

As you can see in this night shot, the Sunshine Sparkle Mist REALLY blended in a cool pattern.

Don't wipe all that cool spray ink up....spritz some water on it if it's dried, and swipe some tags through it. Spritz the tag with water first, it helps.

These are somewhat lighter, but you have to have light on mica to get it to shine...at least in my experience. It's hard to get a good photo of it sparkling.


So, this is the finished frame with "Baby Doe" or "She-Who-Shall-Not-Be-Named"...boyfriends...bleh!

I used the gold thread in all the other buttons and glued in place.

So, take a jump over to the Inspiration Emporium Blog for a chance to win $50 in IE merchandise, and enjoy the other Designers works of ART.

There's 2 new EXTREMELY talented DT Members coming on board...you won't want to miss their projects!

AND a week from today I'll be at Prairie Art Stamps in Springfield teaching the Standing Curio Class. Can't wait to see my friends there again!
Linda


*Products Used and found at Inspiration Emporium*

 from Tim Holtz:
District Market - Composer Tissue Wrap
Idea-ology -  Word Bands, and Corked Vials
Distress Stains - Mustard Seed, Wild Honey, Broken China, Picket Fence
Distress Inks - Faded Jeans, Mustard Seed and Spiced Marmalade
Alcohol Inks - Wild Plum, Watermelon and Stream
Alterations - Movers and Shapers - Mini Tattered Florals and Mini Butterflies

 from Dylusions:
Ink Spray - Bubblegum Pink, Lemon Zest, and Vibrant Turquoise

 from Ranger:
Perfect Pearls Mists - Perfect Pearl and Sunflower Sparkle
Acrylic Paint Dabber - Snow Cap, Aqua, and Gold

  other products:
Core'dinations - Adirondack Collection
Kaiser Rhinestones - Aqua
Prima Marketing - Wood Buttons Songbird
Gold Wire
Gold Metallic Thread
Turquoise Beads
Baker's Twine
Crinoline

Saturday, June 9, 2012

The House of Numbers

Hello all my Friends in ART!


I'm here to share with you one of the great things about an epiphany!

This paper mache house really caught my eye somewhere...I think it was Hobby Lobby or Michael's.

And the cool thing is the roof comes off!

I covered it with Tim's Tissue Wrap-Composer and Terminology using Glue-n-Seal.

Then I added all kinds of Distress Inks, and Distress Stains....I just couldn't get what I wanted, so I kept adding color here and there.


After that I started to stamp with Jet Black Archival Ink and Mixed-Media, Steampunk, and Remnants from Tim, and Doodle Parts from Dylan Reaveley created the leaves on the roof.


Then I decided to make DOORS! Black chipboard and plain CB that have had all kinds of Embossing Powders thrown on them! I LOVE how they turned out.

They were my late night Epiphany!


I used Embossing Powders on the 3 mini numerals, and Alcohol Inks on the Wings(Adornments Regal) and the antenna...that's what I call the thing on top of the chimney.

The sign is made with CB, jump rings, and the screw eyes from Idea-ology.

The Word Band is highlighted with Snow Cap Acrylic Paint and added with a couple of Hitch Fasteners.


The Foundations were perfect for lifting the piece up.

I added Butterscotch Alcohol Ink to the Clock Key and left the Mini-Gears and Label Pulls natural.

The sign is cut from the Destinations Paper Stash.


The Label Pulls above the doors are supposed to serve as awnings and Address Names for whoever would live in this little box...I mean building.

I love the Red Hitch Fasteners for the Word Keys.


Here is the assemblage for the antenna...Foliage, Faucet Knob, and Hitch Fastener...all colored with Alcohol Inks and a brush.

Sometime the stamps and the underlying tissue paper fight each other (like here), but I didn't really care. The overall affect was what I wanted.


The Box Corner and Spinner are also inked. The Mini Gear die was used to cut CB over Metal Foil Tape. The Timepiece has a thick layer of Glossy Accents.

The Hanger Clips had the top clipped off and added just for fun.


Various pieces of CB add dimension to Salvage Stickers and Paper Stash from Lost and Found, Seasonal, and Destinations.


The last thing I do is add all the Pen Stitching and Dots to edges as you can see here. And I shadow the letters and numbers with my Pumice Stone Distress Marker.

I filled in some and outlined the leaves to make them more contrasting. I like the way they shine on the accents.

I picked out Names from the Adverts stamp collection to use for the awning signs.


So there it is, after 44 brads I'd only poked a hole in my finger once, but boy, does that bleed and throb the next day!!!


Don't forget to check out the links below for Inspiration Emporium, still $5 shipping anywhere in the US!!!


Linda

Products Used:

Monday, June 4, 2012

The Rest of the Story...Vacation

If vacation pictures bore you....leave now!

But some people have actually ASKED me to post these to see where we spent a few days.

 I'll keep it to a few words again.


This is at the Rose Hotel on the front porch.

This hotel was built in 1812 on the banks of the Ohio River overlooking the shores of Kentucky.

It's in Elizabethtown, Illinois in Southern Illinois.


This place was bought by the State and gutted. And completely restored.

It was a great place to stay and the breakfast was wonderful.


The Bed and Breakfast hotel had many vintage pictures of ladies in long dresses walking the grounds.

They had several of the many floods that have threatened the area over the last 100 years.


A gazebo has always been on the point of the front yard of the hotel.

Notice the dock level and the height of the rocks.

Last year the flood level was about 8 inches INSIDE the base of the gazebo...is that high or what???

It got up to the basement of the hotel. We estimated the river had to rise 25 feet to this level.

I imagine the shoreline and islands were completely inundated.


The land across the river had to be GONE. Under water completely.


This was a wonderful statue on the hill.


Then we were off to the Cave in Rock and the Shawnee National Forest.

This shows the entry to the cave area.


This cave was used first by Indians. The hole in the top made it great for having the fire's smoke rise and go out the top.

Then Pirates took it over. They would dress as women to lure supply ships coming down the river to the banks where they would be murdered and their supplies taken.

One of the 1st serial killers in the US used this cave as a hideout.

Thus, I and others as well, have gotten pictures of Orbs here...spirits? Ghosts? You be the judge.


This is a grainy picture. But I use it to show you how the next picture was taken right after and the spots of light showed up that didn't show up here. Even though orbs did.


Now....see the 2 spots of light that showed up in the next shot? One is very tiny. 


Click on this picture to see the aura light surrounding the large orb.


See the Orbs??? You can see the sunlight coming in through the hole in the top of the cave.


This is not a particularly flattering picture of me....but it's the one that shows the most Orbs in one frame.

I added contrast to this picture so you could see the Orbs better.


And lastly, here is just one of the many, many barges that went past our hotel and entertained Bill and I for a few great hours.

It was a gorgeous day.

We couldn't have had a better day to sit and relax.

Be Well!

Linda and Bill